Introduction
Do you catch yourself scrolling through food videos (like Fruit sando) late at night? The ones that make your stomach growl at midnight? You’re not alone! At Spoonful of Asia, we love those videos too. We take those addictive TikTok and YouTube Shorts and turn them into recipes you can make at home.
If you’re here, you’ve likely seen those pretty Japanese fruit sandwiches all over your feed. They’re bright, they’re lovely, and they look like they belong in a fancy café. But here’s the good news—you can make them at home!
For those new to our site, welcome! Spoonful of Asia helps bridge the gap between those “I want to make that!” moments and the joy of “I made it myself!” We find trending Asian recipes from short videos, break them down step by step, list all the items you need, and make sure you can remake these dishes without the stress.
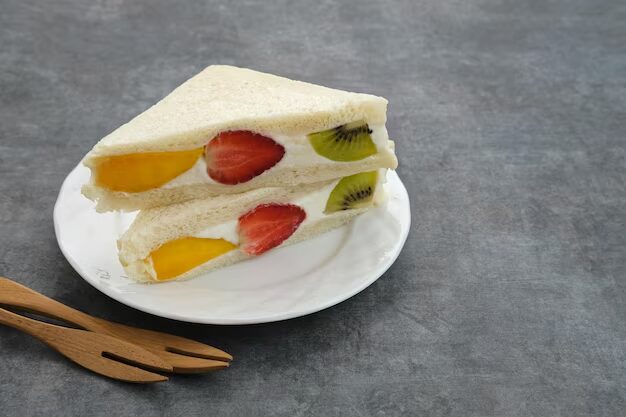
The Japanese Fruit Sando (short for sandwich) has become super popular lately. These colorful treats mix soft milk bread, lightly sweet whipped cream, and fresh, bright fruit. They work great as breakfast, tea time snacks, or after-school treats for kids. They’re as fun to make as they are to eat.
What makes these sandwiches special is how they look—when sliced, they show off a stunning cross-section of fruit that will wow your family or guests. And who doesn’t love a recipe that looks fancy but takes little work? As busy women juggling work, family, and self-care, we love those high-reward, low-effort wins!
Today, we’re focusing on a lovely Fruit Sando recipe that’s trending across social media. The video comes from “Bell ベル | Barista Jepang” on YouTube, and we’ll show you exactly how to make it at home. We’ll cover picking the right bread and fruits to getting that perfect look that will have your friends asking for the recipe.
The Origin Story of Fruit sando: Not Just Another Pretty Sandwich
While scrolling through TikTok between loading the dishwasher and helping with homework, you’ve likely seen these colorful treats. You might wonder, “Where have these been all my life?” These aren’t just another social media trend—Japanese Fruit Sando (フルーツサンド or furutsu sando) have a rich history in Japanese food culture.
Japanese Fruit Sandos aren’t new. They’ve been a beloved snack in Japanese stores and cafés since the 1920s! First made in fancy fruit parlors in Japan, these pretty sandwiches are now part of daily Japanese life. You’ll find them in lunch boxes, cafeterias, and family kitchens across Japan.

The classic fruit sando shows the Japanese love for simple beauty. Using just a few good items—soft shokupan (Japanese milk bread), lightly sweet whipped cream, and ripe fresh fruits—these sandwiches turn basic foods into something special. It’s like magic, but with bread and fruit!
What makes these sandwiches truly Japanese is how they look. In Japanese food culture, the idea of “eating with your eyes” matters a lot. The careful layout of colorful fruits creates a pretty pattern when sliced. This focus on looks isn’t just for show—Japanese food wisdom says that pretty food tastes better because it gets all your senses involved.
The milk bread used in real fruit sandos is worth noting. Shokupan is super soft, fluffy, and slightly sweet—making the perfect base for the fresh fruit and cream. Its texture is key, as it’s sturdy enough to hold the filling without getting soggy, yet soft enough to match the creamy inside.
While classic fruit sandos often use strawberries, kiwi, and mandarin oranges (like our recipe today), there are many types. In Japan, you might find sandos with premium Japanese melon (which can cost over $100 per melon!), ripe peaches in summer, or bright persimmons in fall.
What’s great about the fruit sando’s rise to fame is how easy it makes Japanese cuisine. Not everyone has time or goods to make complex Japanese dishes, but most people can find bread, cream, and some fresh fruit. It’s Japanese food culture made simple to fit busy lives—no special tools or hard-to-find items needed.
So the next time you make these sandwiches for a family snack or pack one in your child’s lunch, you’re not just following a TikTok trend. You’re taking part in a decades-old Japanese food custom that balances simple, healthy, and pretty. And in our busy world of quick foods, isn’t there something fresh about that?
Why These Colorful Fruit sando Will Win Over Your Family

Let’s face it—getting your family excited about new foods can be hard. It’s like trying to convince your kids that homework is fun. But Japanese Fruit Sandos have a secret power: they’re pretty much dessert dressed up as a real meal option. And who doesn’t love pulling that off on a busy night?
First, these bright sandwiches look amazing. In a world where we’re often told not to play with our food, fruit sandos flip that rule. They turn meals into art. When you slice through that sandwich to reveal the rainbow of well-placed fruit, even picky eaters will want to try it. It’s like those big reveal moments on baking shows we all watch after the kids go to bed!
The taste is where these sandwiches really shine. The mix of fluffy whipped cream, just-sweet-enough bread, and fresh fruit creates a perfect flavor that’s rich without being too much. Unlike many trendy foods that look better than they taste, fruit sandos deliver on both looks and flavor.
For busy moms always facing the “what’s for snack/lunch/breakfast” question, fruit sandos offer great options. They work well as:
- A quick breakfast on busy mornings
- A lunch box treat that won’t get traded away
- A snack that has real food value
- A light dessert that meets sweet cravings without sugar overload
Let’s talk about the health perks. While your family will focus on how yummy these sandwiches are, you can smile knowing they’re getting fresh fruit in a form they’re excited about. The protein from the milk in the whipped cream plus the vitamins from the fruit make this a treat you can feel good about serving.
Cost is another plus for fruit sandos. Unlike many fancy-looking recipes that need costly special items you’ll use once, these sandwiches use basic items that won’t break your budget. You can even adapt them based on which fruits are on sale that week, making them wallet-friendly for budget-minded families.
The prep process itself is part of the fun. These sandwiches are simple enough that kids can help make them—adding cream, placing fruit, and watching the magic happen. And we all know that kids are about 127% more likely to eat something they helped make!
Best of all for our busy lives, fruit sandos can be made ahead of time. Make them the night before, and you’ll have a ready-to-go option for those mornings when everyone woke up late and you’re rushing out the door with odd socks and yesterday’s ponytail.
So while these colorful sandwiches might have caught your eye because they’re trending online, they’ll stay in your recipe list because they truly work for real family life. They’re pretty enough for special times but simple enough for every day, tasty enough to feel like a treat but healthy enough to serve often.
Next time you’re staring in the fridge at 4 PM wondering what to feed the hungry kids coming home from school, remember the humble yet mighty fruit sando—the rare food trend that really delivers on its promises!
The Perfect Bread: Why Shokupan Makes All the Difference
Ever wondered why your homemade sandwiches don’t look like those perfect ones in your feed? I’m about to share the secret: it’s all about the bread. Not just any bread works for a real Japanese Fruit Sando—the key is shokupan, Japanese milk bread that’s like a cloud in bread form.
What makes shokupan so special? Think of the softest, fluffiest white bread you’ve ever had, then make it even softer. This isn’t your normal grocery store bread that gets flat when you press it! Shokupan has a soft, fluffy texture with a fine, tight crumb and mild sweetness that pairs perfectly with the fruit and cream filling.
The magic comes from a bread-making method called tangzhong, where some flour is cooked with water to make a paste before being mixed into the dough. This step makes bread that stays soft and fresh for days. It’s like the skincare routine of bread—extra steps, but worth it for that glow!
For busy moms trying to make sandwiches between laundry and Zoom calls, here are your bread options from most to least authentic:
- Make your own shokupan – Most authentic, but who has time to bake bread on a normal Tuesday? Save this for a rainy weekend when the kids need something to do.
- Asian bakeries or Japanese markets – If you live near one, this is your best bet for real shokupan. Stop by during weekend errands and grab a loaf (or three—it freezes well!).
- Brioche or other rich bread – The closest widely-sold option. Look for unsliced loaves so you can cut the right thickness.
- Premium white sandwich bread – In a pinch, the thickest, softest white bread you can find will work. Just avoid anything with lots of holes or a hard crust.
When picking bread for your fruit sando, thickness matters almost as much as the type. You want slices about 3/4 to 1 inch thick—much thicker than normal sliced bread. This gives strength to hold your fillings and creates that tall sandwich look that’s so eye-catching when sliced.
Remember to cut off the crusts before assembly! This isn’t just about looks (though the clean white edges do make a prettier picture). Taking off the crusts ensures the same soft texture throughout and makes the sandwich easier to eat, especially for little ones.
The size of your bread slices will decide how many sandwiches you can make. A typical shokupan loaf is usually square rather than long like American sandwich bread, allowing for perfect square sandwiches when cut. If using long bread, you may want to trim it to make even squares.
One pro tip that sets fruit sando experts apart: lightly butter the inside of your bread slices before adding the cream filling. This makes a thin moisture barrier that keeps the bread from getting soggy too quickly. It’s that small extra touch that helps your sandwiches stay firm long enough to take that perfect photo before eating!
For those watching costs (and who isn’t these days?), keep in mind that while special bread might cost more upfront, the wow factor of these sandwiches makes them perfect for special times when you might otherwise buy store treats. Think birthday breakfasts, Mother’s Day, or impressing in-laws without spending too much!
Fruit Selection Secrets: Creating That Perfect Cross-Section
Let’s talk fruit strategy—because yes, with fruit sandos, there is strategy! The fruits you choose and how you place them will make all the difference between an “okay” sandwich and one that makes your family gasp when you slice it open. And let’s be honest, we’re all here for those gasp-worthy kitchen moments!
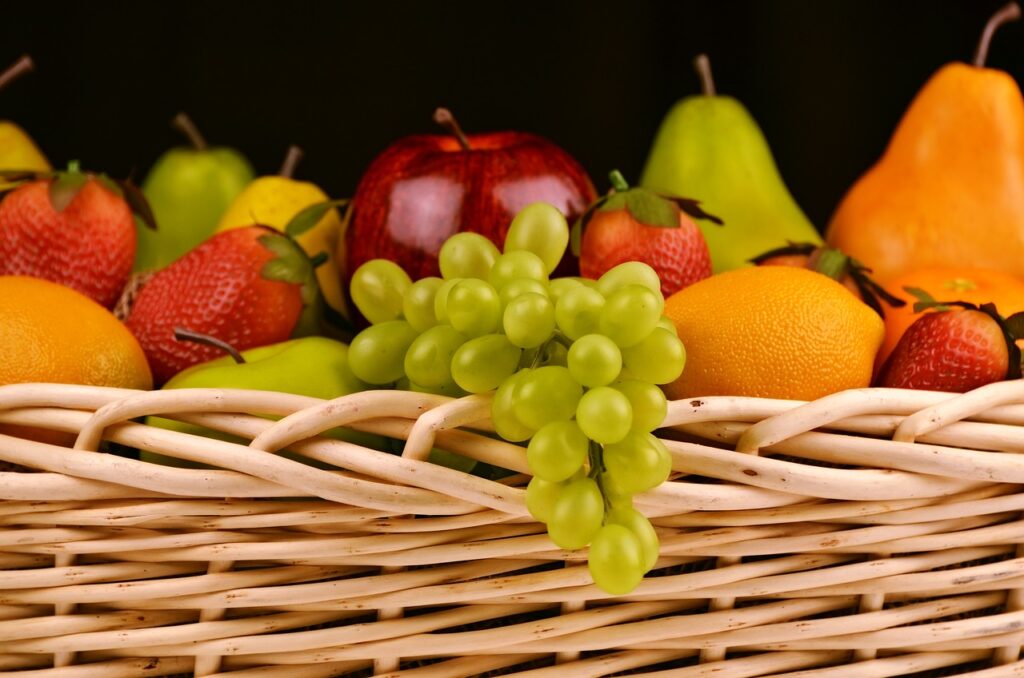
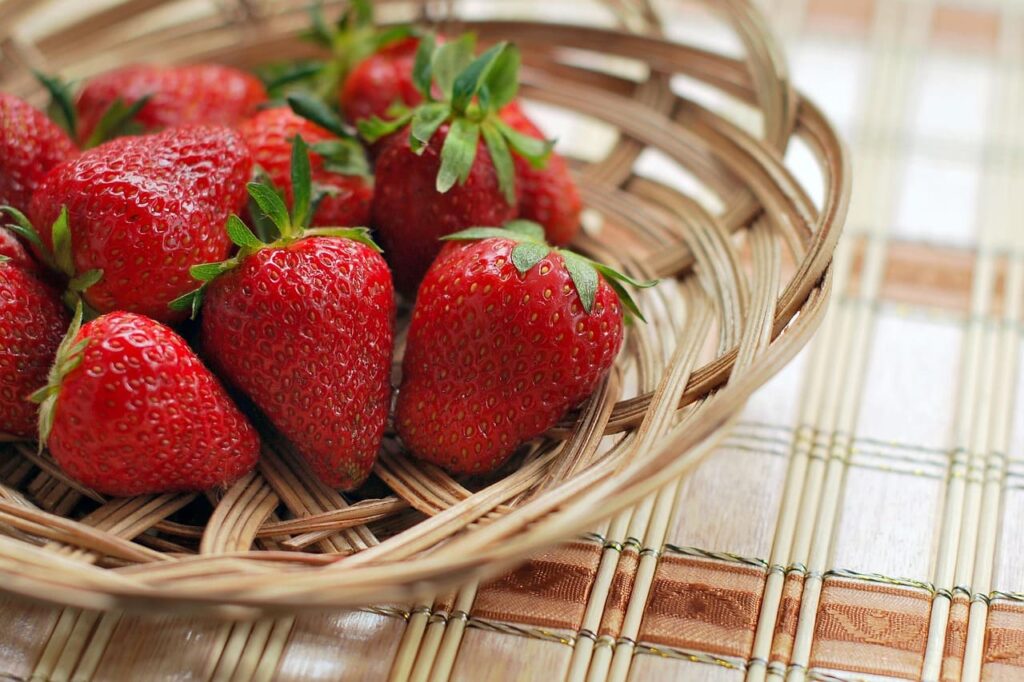
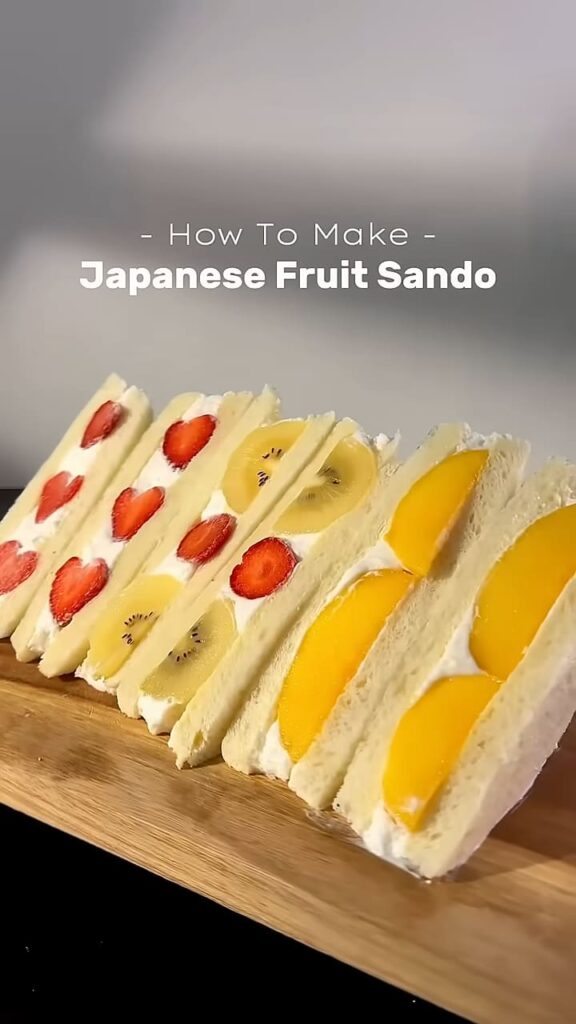
Think like an artist when picking your fruits. You’re making an edible mosaic, so variety in color, shape, and texture is key. The classic mix of strawberries, kiwi, and mandarin oranges works well because it gives you red, green, and orange—a bright color mix that pops against the white bread and cream.
But don’t feel stuck with just the classics! Here are some great fruit options that work well in sandos:
- Berries: Strawberries, raspberries, blueberries, blackberries
- Stone fruits: Peaches, nectarines, plums (when in season)
- Tropical fruits: Mango, dragon fruit, starfruit, papaya
- Citrus: Mandarin oranges, blood oranges
- Other favorites: Kiwi, banana, grapes (seedless), persimmon
When picking fruit, firmness is crucial. That super-ripe peach might taste amazing eaten over the sink with juice dripping down your arm, but it will turn your pretty sandwich into a soggy mess. Choose fruits that are ripe but still firm to touch. Think first-date handshake firm, not dead-fish handshake limp!
Think about your fruit prep carefully. For the most stunning cross-section:
- Cut strawberries in half from stem to tip to create heart shapes when sliced
- Slice kiwi into rounds about 1/4 inch thick
- Fully separate mandarin segments, removing all white pith
- If using mangoes or similar fruits, cut into neat squares or rectangles
Pro-tip from seasoned fruit sando makers: plan your layout before assembly. Lay out your fruit on a cutting board in the pattern you want to see in the cross-section. This prevents that moment of letdown when you cut open your sandwich only to find all the prettiest fruit pieces hidden in the corners!
For budget-minded moms (that’s most of us), seasonal fruit is your friend. Not only is it cheaper, but it’s also at peak flavor and nutrition. Winter strawberries shipped from far away might look pretty, but they’ll cost three times as much and taste bland. Use what’s in season and change your mix throughout the year!
Here’s a budget-friendly seasonal guide:
- Spring: Strawberries, cherries
- Summer: Peaches, nectarines, plums, berries
- Fall: Apples (firmer types), persimmons, pears
- Winter: Citrus fruits, kiwi, bananas
When feeding picky eaters, try having a “tasting party” with small pieces of possible fruit sando fillings. Let your kids vote on their favorites before making the sandwiches. This time spent upfront prevents the sadness of carefully placing fruit your child suddenly “doesn’t like anymore” despite eating it happily yesterday.
One last secret from the fruit sando experts: pat your fruit dry with paper towels before placing. Extra moisture is the enemy of a picture-perfect sandwich. Taking an extra minute to remove surface wetness helps ensure your creation stays intact and pretty until that magic moment when you slice it open to reveal your fruity masterpiece!
The Perfect Whipped Cream: Your Fruit Sando Best Friend
Let’s get real about the whipped cream in fruit sandos—it’s not just a side player, it’s the glue that holds this whole yummy concept together! Literally and figuratively! Getting your whipped cream right makes the difference between a sandwich that’s Instagram-worthy and one that falls into a sad, soggy mess before you can even say “cheese!”
The ideal fruit sando cream is stable, lightly sweet, and just firm enough to hold your fruit in place without being too heavy. Unlike the spray can stuff that turns to liquid within minutes, proper whipped cream for fruit sandos needs to last. Think of it as the shape wear of your sandwich—giving support where it’s needed most!
Here’s your easy formula for perfect fruit sando cream:
- Start with heavy whipping cream (nothing lighter will work right) that’s been chilled in the fridge. Pro tip: put your mixing bowl and beaters in the freezer for 10-15 minutes before whipping—cold tools mean faster, more stable whipped cream.
- Add sugar to taste, but not too much. The usual mix is 1-2 tablespoons of sugar per cup of cream. Remember, your fruit adds natural sweetness, so the cream doesn’t need to do all the work in the flavor area.
- A bit of vanilla extract (about 1 teaspoon per cup of cream) adds depth without drowning out the gentle fruit flavors. It’s like a great neutral sweater—it goes with everything and makes everything better!
- Whip until you reach medium-firm peaks—this is key! Under-whipped cream will run everywhere; over-whipped cream turns buttery. You want the cream to hold its shape when you lift the beaters, with peaks that gently curl over at the tips.
If you’re having one of those days where even finding matched socks feels like a win (we’ve all been there), here’s a stable whipped cream hack that busy moms swear by: add 1 tablespoon of instant vanilla pudding mix per cup of cream before whipping. This secret helper makes your cream hold its shape longer without changing the flavor much.
For those watching sugar intake or calories, there are options:
- Mascarpone cheese mixed with a little heavy cream creates a less sweet but equally tasty filling
- Greek yogurt sweetened with a touch of honey makes a tangier, protein-rich option
- For special diet needs, coconut cream can be whipped for a dairy-free version
When spreading your cream on the bread, aim for even, thick layers about 1/2 inch thick. The key is making a “nest” for your fruit—slightly thicker around the edges and with small dips where the fruit will sit. This prevents sliding and creates that perfect look where the fruit seems to float in the cream when sliced.
Always fill in gaps between fruit pieces with more cream. This gets rid of air pockets that can make your sandwich collapse and ensures every bite has the perfect mix of bread, cream, and fruit. Think of it like caulking around your bathtub—not the most glamorous job, but vital for the end result!
One mistake many fruit sando beginners make is thinking more cream is always better. In truth, balance is key—too much cream will squish out the sides when you press, making a messy eating experience. Aim for enough cream to fully wrap your fruit without spilling over.
Remember that well-whipped cream can be made a few hours ahead and kept in the fridge, but it’s best when freshly whipped. If you’re making these for a party or special breakfast, try having all your other parts ready, then whip the cream right before assembly for the best texture and flavor.
Assembly and Presentation: The Instagram-Worthy Finish
Now comes the big moment—turning your parts into a showstopping sandwich that will have everyone reaching for their phones before taking a bite! Assembly is where the magic happens, changing simple items into an edible work of art that looks pro enough to be sold in a fancy café.
First, let’s talk timing. Fruit sandos are best made 3-4 hours before serving—this gives them enough time to chill and set, letting the flavors blend nicely without the bread getting soggy. Perfect for morning prep before school and work, then enjoying as an afternoon treat when everyone’s energy is crashing!
Your assembly station should include:
- Crustless bread slices
- Your prepared whipped cream
- Cut and dried fruit arranged in your planned pattern
- Softened butter (optional but recommended)
- Plastic wrap
- A sharp knife for the final cut
Start by laying out your bread slices on a clean work surface. If using the butter barrier method (highly recommended for longer-lasting sandwiches), spread a very thin layer of softened butter on each slice of bread. This makes a moisture barrier that helps keep your bread from getting soggy too quickly—it’s like rainproofing for your sandwich!
Now for the cream application: spread a thick layer (about 1/2 inch) of whipped cream on two slices of bread, making a slight dip in the center where your fruit will sit. The cream should be slightly thicker around the edges to keep fruit from poking through the sides of your sandwich.
Fruit placement is where your inner artist comes out to play! Arrange your prepared fruit in the pattern you’ve planned, keeping in mind that what you see when looking down at your sandwich isn’t what you’ll see in the cross-section. Place your fruits so that when sliced, they create the pattern you want. Popular layouts include:
- Diagonal stripes of differing fruits
- Circles radiating from the center
- Heart shapes formed by strawberry halves
- Geometric patterns like checkerboards or triangles
After placing your fruit on one cream-covered slice, carefully fill in all gaps between fruits with more cream. This step is crucial—any air pockets will cause your sandwich to collapse when sliced. Think of it like grouting tiles; it’s not the most glamorous step, but it makes all the difference in the final look.
Top with your second cream-covered bread slice, pressing down very gently to secure. The key word here is gently—too much pressure will cause your filling to squish out the sides, ruining your clean edges.
Now comes the most important step for picture-perfect results: wrapping. Tightly wrap each sandwich in plastic wrap, applying gentle, even pressure on all sides. This does three essential things:
- Forces the cream to fill any remaining air pockets
- Helps the sandwich hold its shape
- Keeps the bread from drying out while chilling
Place your wrapped sandwiches in the refrigerator for at least 3 hours, though overnight is even better if you’re planning ahead. This resting period is a must—skip it, and you’ll end up with a messy result when you try to cut your sandwiches.
When it’s finally time to serve, unwrap your chilled sandwich and use a sharp knife (serrated works best) to slice it in half diagonally or into quarters, depending on your preferred look. For maximum gasps from your audience, make the cut right at the table for dramatic effect!
For an extra special presentation, consider:
- Serving on a white plate to showcase the vibrant colors
- Adding a light dusting of powdered sugar for a touch of elegance
- Garnishing the plate with extra fresh berries or mint leaves
- Pairing with a complementary tea for an authentic Japanese café experience
Remember to take your photos quickly—these beauties look their best right after slicing. Though with how tasty they are, I doubt they’ll last long enough for the perfect lighting anyway!
Making Fruit Sando Fit Your Life: Variations and Tips
Now that you know the basics of Japanese fruit sandos, let’s talk about making these gorgeous treats work for your real life. Most of us juggle too many tasks to follow recipes exactly! The beauty of fruit sandos is their flexibility, and with a few smart changes, you can adapt them to fit your family’s likes, dietary needs, and whatever you happen to have in the fridge.
First, let’s address the “I don’t have time to find special bread” situation. While authentic shokupan is wonderful, these options work well in a pinch:
- Brioche bread (widely available and has a similar soft texture)
- Texas toast-style thick white bread
- Hawaiian sweet bread
- Even regular sandwich bread (doubled up for thickness)
Remember, the fruit sando police won’t show up at your door if you use regular bread—do what works for your life!
For families with dietary needs, these sandwiches are surprisingly adaptable:
- Gluten-free: Use gluten-free white bread with a soft texture
- Dairy-free: Whip coconut cream instead of heavy cream
- Vegan: Combine dairy-free bread with whipped coconut cream
- Lower sugar: Use less or no added sugar in the cream and rely on the natural sweetness of ripe fruit
When life gets extra busy, try these time-saving shortcuts:
- Pre-whipped cream from the dairy section (not spray can type—look for the tub)
- Pre-cut fruit from the grocery store produce section
- Make a batch assembly line and prepare several sandwiches at once
- Freeze fully assembled sandwiches for up to a month (thaw overnight in the refrigerator)
For budget-conscious families (and who isn’t watching their grocery bill these days?), fruit sandos can be thrifty if you:
- Use whatever fruits are on sale that week
- Add in cheaper fruits like bananas or apples as filler
- Make mini sandwiches using smaller bread to stretch premium items further
- Use slightly bruised fruit that might otherwise go to waste (just cut away any imperfect parts)
The fruit combinations are endless! Beyond the classic strawberry-kiwi-mandarin trio, try these tested combos:
- Summer berry medley: strawberries, blueberries, and raspberries
- Tropical vacation: mango, kiwi, and banana
- Fall harvest: thinly sliced apple, pear, and persimmon
- Citrus sunshine: blood orange, grapefruit, and mandarin
For special occasions or when you’re feeling extra creative:
- Use cookie cutters to cut the bread into fun shapes before assembling
- Color the whipped cream with natural food coloring for themed parties
- Create pattern templates from paper to help arrange fruit in specific designs
- Add edible flowers between fruit pieces for a particularly elegant look
When serving to young children or at parties where mess is a concern:
- Make quarter-sized sandwiches for easier handling
- Secure with decorative toothpicks to prevent slipping
- Chill sandwiches for longer (5+ hours) to ensure maximum stability
- Consider a slightly firmer whipped cream by adding a stabilizer
For meal preppers who like to plan ahead, you’ll be happy to know that fully assembled fruit sandos can be kept in the fridge for up to 24 hours before serving. The key is that moisture barrier (remember the thin butter layer?) and proper wrapping. For best results, store them away from strong-smelling foods in your refrigerator—bread easily picks up odors.
And for those days when nothing goes as planned? A deconstructed fruit sando makes a lovely dessert—toast some bread, top with whipped cream and fruit, and call it a fruit sando toast point. Same flavors, much less precision needed, and nobody will know you ran out of time for the full assembly!
Why This Fruit Sando Trend Has Staying Power
In a world where food trends come and go faster than you can say “TikTok challenge,” the Japanese fruit sando has shown remarkable staying power. And there’s good reason for that. Unlike many viral food creations that sacrifice substance for style, these picture-perfect sandwiches deliver on both fronts—they’re as tasty to eat as they are beautiful to look at.
What sets fruit sandos apart from passing food fads is how easy they are to make. While some viral recipes need special tools or items you’ll never use again (looking at you, mini cereal pancakes that needed a specific tiny pan), fruit sandos use simple things most of us already have or can easily find. Bread, cream, fruit—that’s it! No special unicorn extract or cloud-harvested moon water required!
The versatility of these sandwiches also adds to their lasting popularity. They easily fit as:
- Breakfast option that feels special but isn’t loaded with sugar
- Lunchbox treat that won’t get traded away
- Afternoon snack that actually provides some nutrition
- Light dessert that satisfies sweet cravings without being heavy
- Party food that impresses guests with minimal effort
For busy parents always looking for ways to encourage healthier eating habits, fruit sandos offer a rare win. They showcase fresh fruit as the star rather than hiding it in batter or drowning it in sugar. The visual appeal makes even reluctant fruit-eaters more willing to try them, and the hands-on assembly process can turn food prep into family bonding time.
The Japanese cultural angle adds another layer of staying power. As more families seek to explore global food traditions, fruit sandos offer an easy entry point to Japanese cuisine. They provide a gentle intro to Japanese aesthetic principles of simplicity, visual harmony, and seasonal appreciation without needing unfamiliar techniques or items.
From a practical standpoint, these sandwiches hit the sweet spot between effort and reward. The assembly process is simple enough for weekday prep but yields results impressive enough for special occasions. This versatility makes them a recipe worth adding to your regular rotation rather than just trying once for the novelty.
The timing of the fruit sando trend also aligns perfectly with broader cultural shifts. As more people seek balance between convenience and wholesome eating, these sandwiches offer a refreshing middle ground—they’re made with real, simple ingredients while still being convenient and portable. They satisfy our desire for photogenic food without using artificial colors or flavors.
Perhaps most importantly, fruit sandos bring a moment of joy to ordinary days. In our often hectic lives, turning a simple sandwich into something beautiful creates a small celebration—a reminder that everyday meals can be special too. When you slice into that sandwich to reveal the perfect cross-section of colorful fruit, there’s a genuine moment of delight that goes beyond just making a meal.
The staying power of fruit sandos isn’t just about how they look on your Instagram feed—it’s about how they make you feel when you share them with your family. It’s about creating little moments of beauty and joy in the midst of busy weeks. It’s about turning something as ordinary as a sandwich into something extraordinary without complicating your life.
So while many viral food trends will fade away, the Japanese fruit sando has earned its place in our recipe collections. Its blend of simplicity, beauty, adaptability, and genuine deliciousness guarantees it will continue to grace our tables long after the latest food fad has been forgotten.
Conclusion: Your Turn to Create Fruit Sando!
We’ve journeyed through the colorful world of Japanese fruit sandos—from their rich cultural roots to practical tips for creating your own edible works of art. Now it’s your turn to bring this delightful creation into your own kitchen! The beauty of fruit sandos lies not just in their look but in their ability to transform simple ingredients into something truly special.
Remember, your first try doesn’t have to be perfect. Like any new recipe, there’s a learning curve, and even “imperfect” fruit sandos will be delicious! Besides, those slightly messy ones make for the best taste-testing—chef’s privilege!
The recipe we’ve shared today, inspired by the viral video from “Bell ベル | Barista Jepang,” is just the beginning. Once you master the basic method, the creative options are endless. Let the seasons guide your fruit choices, your family’s tastes influence your flavors, and your own artistic vision shape the presentation.
What makes these sandwiches particularly special is how they can brighten everyday moments. Pack one in your child’s lunchbox with a little note, and you’ve turned a normal Tuesday into something memorable. Serve them at your next book club meeting, and watch your friends’ faces light up. Create a fruit sando assembly station for a family breakfast, and transform a weekend morning into a fun activity that even teens might join!
We’d love to see your creations! Share your fruit sando photos on social media and tag Spoonful of Asia—we might even feature your masterpiece on our page. And don’t forget to credit “Bell ベル | Barista Jepang” if you were inspired by their original video.
For the full recipe with exact measurements and step-by-step instructions, scroll down to our recipe card below. And if you’re looking for more trending Asian recipes translated from social media to your kitchen, be sure to browse our collection of other viral favorites.
Thank you for joining us on this food adventure! At Spoonful of Asia, we’re passionate about making trending recipes easy to follow, no matter your skill level or how busy your schedule might be. We believe good food brings joy, and everyone deserves more joy in their daily life—especially when it comes in the form of a beautiful, tasty sandwich!
Ready to start creating? Follow the recipe below and watch as simple ingredients transform into an extraordinary treat that’s sure to become a family favorite!
Credit: This recipe was inspired by a video from “Bell ベル | Barista Jepang” on YouTube. We’re grateful for content creators who share their cooking talents and inspire us all to try new things in our kitchens!

Viral Japanese Fruit Sando: The TikTok Sensation That’s Actually Worth the Hype
Description
| Fruit Sando, or Japanese fruit sandwich, is a popular treat made with soft milk bread, fluffy whipped cream, and colorful seasonal fruits. It’s easy to prepare and visually stunning—ideal for picnics, brunch, or impressing on social media. |
Ingredients
Instructions
(Japanese fruit sandwich) Fruit Sando
-
Prepare the whipped cream
In a cold bowl, beat the heavy cream, sugar, and optional vanilla extract until soft peaks form. -
Prep the fruits
Wash, peel, and cut the fruits into desired shapes (avoid overripe or juicy fruits to prevent sogginess). -
Assemble the sandwich
Spread a thin layer of softened butter (optional) on each slice of bread. Then spread whipped cream evenly on two slices. -
Place the fruits
Arrange fruits in a pattern (like a diagonal or heart-shaped layout) on top of one whipped cream slice. Cover with more whipped cream to fill gaps. -
Seal and wrap
Top with remaining bread slices, press lightly, then tightly wrap each sandwich in plastic wrap. -
Chill
Refrigerate the wrapped sandwiches for at least 3 hours. This helps the cream set and makes cleaner cuts. -
Slice and serve
Once chilled, unwrap and cut each sandwich in half diagonally or in thirds to reveal the colorful fruit pattern. Serve immediately.